How to Sew a Book Cushion Cover - Sewing Tutorial
- Oct 16, 2021
- 2 min read
This cushion cover is a always a favorite for kids. The pocket on the front of the cushion is the pefect size for little ones to keep their books or small toys in and the handle on the top makes the cushion easy to carry. This cushion has a zip at the back to close.

Fabric featured -
I've made the cushion up in different fabrics. I've used the Peter Rabbit cotton as well as the Outer Space cotton from Dunelm

The Outer Space cushion is a simplified version, not using piping cord around the edge and without a handle.
What you’ll need:
18” cushion pad
18.5” front fabric
18.5x11” Pocket fabric x2
18.5x19.5” back fabric
4” x 12” strip of handle fabric
20” Zip
Bias binding measuring 19” for pocket
Bias binding measuring 78”
78” of 1/8” wide Piping cord
Quilting clips or pins
Fabric glue pen
Quick unpick
Use ¼” seam allowance (unless stated otherwise)
1. Place the two pocket fabric pieces wrong sides together. Fold the 19” strip of bias binding in half lengthways and press. Clip the bias binding to the top of both pieces, sandwiching the fabric between and sew.

2. To make the handle, fold the handle strip of fabric in half lengthways and press. Open out and fold the long sides in to meet at the middle and press. Fold this in half and press once again.

3. Sew down both long sides of the strip.

4. Place the pocket fabric over the bottom of the front fabric and sew around the 3 sides, leaving the pocket open at the top.
5. To make the piping cord, open out the remaining bias binging and press. Wrap around the cord and sew close to the cord. Trim the long edge back to leave a ¼” seam allowance.

6. Clip then sew the piping right sides together around the entire edge of the cushion facing inwards. Leave a couple of inches of cord spare at each end.
TIP - to sew piping around the corners, snip into the seam allowance of the piping fabric to allow it to ease around as you sew.

7. Pull 1” of cord from its casing and trim. Fold the edge of the fabric inwards by ½”. Take the remaining end of the cord and trim so that the ends of the cord match. Push the raw end of the cord inside the folded over end and sew in place.

8. Sew the handle to the top of the cushion cover facing inwards. Make sure the handle is central measuring 6” from each side.

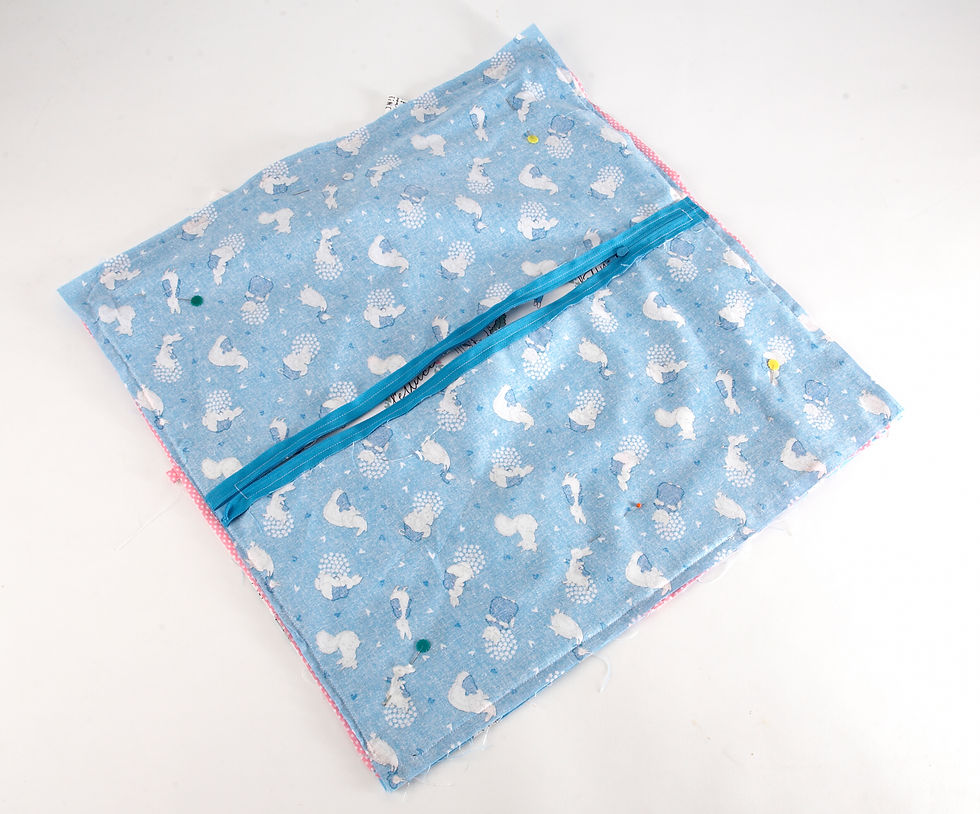
9. Cut the backing fabric in half, then re-sew with a ½” seam allowance. Press the seam open.

10. Place the zip facing downwards over the seam, secure with a glue pen if you have one. Sew all around the zip from the right side.

11. Unpick the stitches over the zip teeth.

12. Trim the ends of the zip. Pin the front and back panels right sides together and with the zip open, sew all around. (Your back fabric may need to be trimmed to match the front.)
13. Turn the right side out, insert your cushion pad and you’re finished!


Fabric gifted from The Bee Fabric Co and Dunelm to create this blog


Comments