How To Sew A Reverse Applique Heart Cushion Cover
- Jan 28, 2022
- 2 min read
Updated: Feb 7, 2025
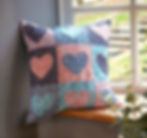
Reverse applique is a technique whereby the top layer of fabric is cut away to reveal a different fabric underneath. This project uses the method of reverse applique with heart shapes to create a pretty, floral cushion cover with a zip back. It’s a great way to spread some love in your home for Valentine’s Day or even as a gift!
This is a fat quarter friendly project and is made using 5 fat quarters. The cushion back uses two different prints.
Video tutorial -
What you’ll need:
Heart template -
45cm Cushion pad
36cm Zip
Two pieces of fabric measuring 45 x 25 for the backing
Nine 17cm squares of floral fabric
Nine 13cm squares of floral fabric
Nine 13cm squares of scrap fabric
Sharp scissors
Fabric glue pen (I’ve used Gutermann HT2)
Erasable fabric pen
Quick unpick
Pins
Use 1cm seam allowance
Instructions:
1. Draw around the heart template on the centre of each scrap piece of fabric.

2. Place each scrap fabric centrally over the right side of each 17cm square. Pin in place.

3. Sew over the heart lines. Use a smaller stitch as it's easier to create a good curve than using a longer stitch.
4. Carefully cut out the centre of the heart shape. Cut as close as possible to the stitch lines. Snip the point of the top ‘v’ off inside the seam and cut a snip in the seam at the bottom point.

5. Push the remaining scrap fabric through the cut-out heart shape and press flat on the other side. Make sure no scrap fabric can be seen from the front.

6. Place the cut-out shape over the 13cm square of floral fabric. Sew around the heart shape close to the edge.
Repeat with the remaining squares.
TIP – you can arrange the hearts in rows of 3 before sewing to decide on the colour placement.

7. Sew the squares right sides together in rows of three. Press the seams flat.

8. Sew the rows right sides together and press the seams flat.

9. To create the zipped back, place the two backing pieces of fabric width ways, right sides together and sew. Press the seam open.

10. Place the zip, teeth down, centrally over the seam. Use a glue pen to hold in place.

11. Sew all around the zip. Use a seam ripper to unpick the stitches from the right side over the zip teeth.

12. Sew the front and back cushion pieces right sides together, leaving the zip open. Snip across the corners then turn the right side out.

13. Insert the cushion pad and the cushion is finished!

Fabric commissioned by The Craft Company for this project