How to sew 16 at a time half square triangles
- Oct 8, 2025
- 3 min read
How to Sew 16-at-a-Time Half Square Triangles
If you’ve ever made a quilt, you’ll know that half square triangles (HSTs) pop up everywhere. They’re one of the most versatile patchwork units, perfect for star blocks, chevrons, pinwheels, and all sorts of geometric layouts.
But trimming and piecing them one by one can be quite time-consuming!
So here I’m sharing a great time-saving method: how to make 16 Half Square Triangles at once! This technique is quick, accurate, and great for using up fabric squares you already have cut.

You’ll Need
Two fabric squares (one light, one dark)
Rotary cutter and ruler
Pencil or fabric marking pen
Cutting mat
Sewing machine
Iron and pressing mat
Step 1: Cut Your Squares
To make 16 HSTs at once, start with two equal-sized fabric squares. For this tutorial, I started with 14" squares, which give an unfinished size of around 3½" - 4", depending on how much you trim. I prefer to trim just a little to avoid fabric waste, so my HSTs finished at 4".
There is a cutting chart at the end of this blog
Step 2: Prepare for Sewing
Place your two squares right sides together. Sew around the four sides using a ¼" seam allowance.

Next, draw a vertical and horizontal line, centrally, so your square is divided into four equal sections. These will become your sewing guides.

Sew a seam ¼" away from each side of both diagonal lines.
Step 3: Cutting the Squares
Cut along the drawn horizontal and vertical lines. Then, cut diagonal lines from corner to corner, creating an “X”.
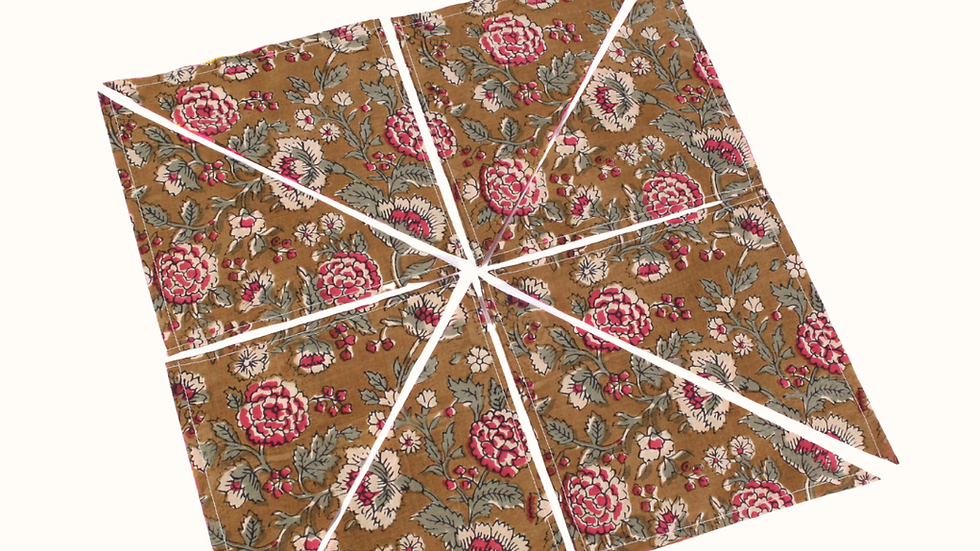
Step 4: Sub Cutting
Cut each quarter diagonally.

You’ll end up with 16 small triangle units.
Step 5: Press and Trim
Open each triangle and press the seam allowance towards the darker fabric (or whichever direction gives less bulk). Trim each HST to your desired unfinished size (4").

Step 6: Arrange and Sew
Now for the fun part - arranging your HSTs into a block! Here are some layout ideas:
Pinwheel (classic and dynamic)
Diamond layout (great for modern quilts)
Flying geese rows or zigzags
Once you’ve settled on your layout, sew them together in rows, pressing as you go.

Tips for Perfect HSTs
✨ Starch your fabric before cutting to reduce stretching.
✨ Press, don’t drag your iron, especially since the edges are on the bias.
✨ Trim consistently to make your final block sit flat and neat.
That’s It!
You’ve just made 16 perfect HSTs - all from two squares of fabric! Once you’ve tried this method, you’ll never go back to sewing them one by one. It’s perfect for scrappy quilts, star blocks, or when you just want to make a big batch in one go.
I've used these quilt blocks to make ruffled cushion covers.

Have you tried the 16-at-a-time method before? Let me know in the comments or tag your blocks with @whatkimberleymakes so I can see them!
Happy sewing!
Kym
Cutting Chart
This chart is designed as a practical guide based on my own 16 at a time half square triangle method, with minimal fabric waste and very little trimming required afterwards. The measurements are intentionally kept quite tight, so you get the largest possible units from your starting squares while still leaving enough room to square things up neatly. Because all of the edges are cut on the bias, the fabric can stretch slightly during sewing and pressing, so treat the sizes as a guide rather than an exact science. If you prefer a little extra trimming room or are working with slippery fabrics, you can always size up your starting squares slightly.
Starting Squares | Makes 16 HSTs Trimmed To | Finished Size |
8" | 2.5" | 2" |
10" | 3.5" | 3" |
12" | 4" | 3.5" |
14" | 4.5" | 4" |
16" | 5" | 4.5" |
18" | 5.5" | 5" |
20" | 6" | 5.5" |


This is such a helpful and well-explained tutorial that makes the process of creating half square triangles feel much more efficient and approachable. The step-by-step method of making 16 units at once is a great time-saving technique, especially for larger quilting projects where consistency and accuracy really matter. It’s interesting how the article breaks down each stage, from sewing around the squares to cutting along both straight and diagonal lines, turning what could feel like a complicated process into something simple and manageable . The clear guidance and practical tips make it easy for both beginners and experienced quilters to follow along with confidence. In a similar way, structured explanation is key when learning any detailed concept, just like when…