How to Make a Large Folded Fabric Star: No Sew Christmas Decoration (origami star)
Updated: Sep 2
The folded fabric star is a popular handmade Christmas decoration, usually made small enough to hang on the tree. For this project, I have taken the same folding technique and scaled it up to create a large fabric star that makes much more of a feature.

Made using just four strips of cotton fabric, the star is folded and woven together without any sewing. It looks lovely hanging from a door, displayed in a window or added to a festive wall alongside smaller handmade decorations.
You can use one fabric for the whole star, alternate between two prints or combine four coordinating fabrics. Quilting cotton works particularly well as it presses neatly and holds the folds in place.
Watch the large folded star video tutorial
The weaving stage is much easier to understand once you see the strips moving into position, so I recommend watching the video alongside the written instructions.
What you’ll need
To make one large folded fabric star, you will need:
Four strips of quilting cotton measuring 8 x 30 inches
Quilting ruler
Rotary cutter and cutting mat, or fabric scissors
Iron and ironing board
Fabric glue or a hot glue gun, optional
Ribbon, string or cord for hanging
Spray starch, optional
Fabric options
You can make the star using:
Four strips from the same fabric
Two strips from each of two coordinating fabrics
Four different fabrics for a more colourful finish
Small prints and non-directional designs are the easiest to work with. Plain cotton, gingham, stripes and festive blender fabrics would also work well.
How to make a large no sew folded fabric star
Step 1: Cut the fabric strips
Cut four strips of cotton fabric, each measuring 8 x 30 inches.

Step 2: Press the strips
Fold one strip in half lengthways with the wrong sides together. Press along the fold to create a centre crease.

Open the strip again. Fold both long raw edges in so that they meet at the centre crease and press.

Fold the strip in half along the original crease, enclosing the raw edges inside. Press again.
Your finished folded strip should measure approximately 2 inches wide.

Repeat with the remaining three strips.

Tip: A small amount of spray starch can help the fabric hold its shape and create sharper folds.
Step 3: Fold the strips in half
Fold each prepared strip in half, bringing the short ends together.
Press or finger press the folded end. These folds will be used to interlock the four strips and form the centre of the star.

Step 4: Weave the centre
Place the first folded strip vertically with its folded end at the top.
Slide the second folded strip through the folded end of the first strip, positioning it horizontally.
Slide the third strip through the folded end of the second strip.
Add the fourth strip in the same way, then pass its ends through the folded end of the first strip. This will connect all four strips and create a woven square.

Gently pull the strips until the centre closes and the fabric sits neatly. Try to keep the strips even without pulling so tightly that the fabric puckers.

Step 5: Secure the woven square
Turn the woven centre over.
Fold one of the top fabric strips across the centre. Continue around the square, folding the next strip over the previous one.


When you reach the fourth strip, fold it across and tuck the end underneath the first folded strip.

Gently pull each strip to tighten the centre. You should now have a secure woven square with eight loose fabric ends extending from it.
Step 6: Make the first star point
Choose one of the fabric strips.
Fold the strip away from the centre at a diagonal angle.

Fold it again in the opposite direction to create a pointed triangle.

Fold the triangular point in half towards the woven centre.
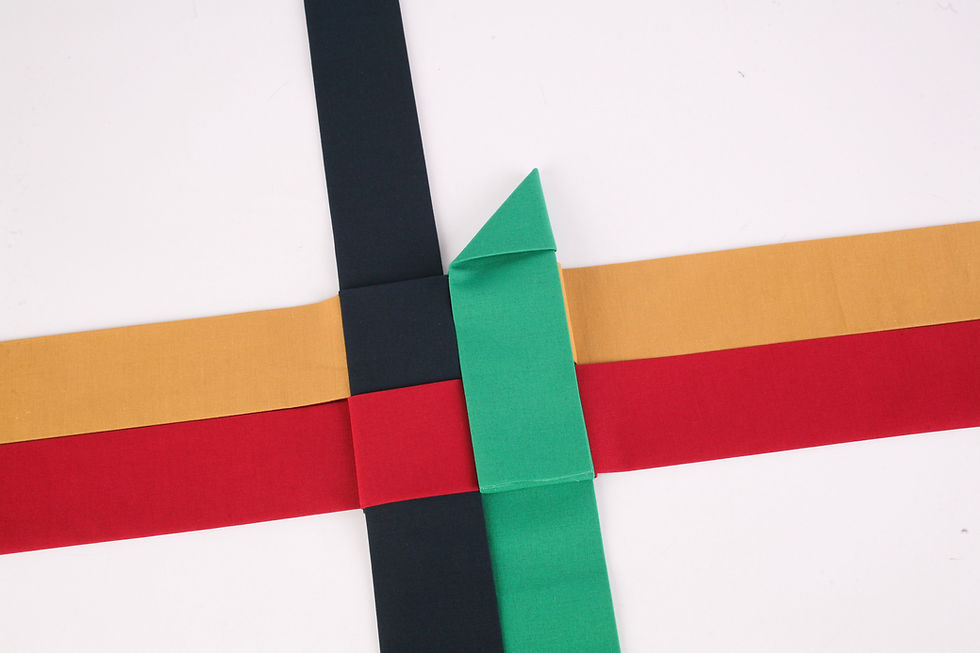
Feed the long fabric end underneath the neighbouring section of the woven square. Pull it through gently until the point sits neatly against the centre. Trim back the strip you've just folded so that it will tuck under the strip below it.


Secure with a dab of glue if you wish.
Step 7: Fold the remaining points
Continue around the first side of the star, folding every other strip to create four points.
Turn the star over and repeat the same process with the four remaining strips.


Once you've made four points, turn the star over and continue on the other side.

When complete, the star will have eight folded points.


Step 8: Secure the folds
The woven construction should hold the star together, but you can add a small amount of fabric glue beneath each tucked end for extra security.
Allow the glue to dry fully before hanging the star.
Give the finished star a light press if needed. Avoid flattening the centre too firmly as the layers of fabric will be quite thick.
Step 9: Add the hanging loop
Cut a length of ribbon, cord or string and form it into a loop.
Thread it through one of the star points or secure it to the back with a small amount of glue.
Your large folded fabric star is now ready to hang.
How to change the size
The star can easily be made smaller or larger by changing the width and length of the fabric strips.
As a general guide, cut each strip approximately four times as long as it is wide. All four strips must be exactly the same size.
For smaller tree decorations, try four strips measuring 4 x 16 inches. For an even larger feature decoration, increase the measurements while keeping the same proportions.
Larger stars need more fabric length for folding and tucking, so avoid making the strips too short.
Ideas for displaying your folded fabric star
Use your finished star as:
A large Christmas wall decoration
A window decoration
A handmade door decoration
Part of a festive gallery wall
A decoration for a mantel or shelf
The centre of a Christmas wreath
A handmade gift
A feature decoration above a Christmas table
You could also make several stars in different sizes and hang them together using ribbon at different lengths.
More handmade Christmas ideas
This large folded fabric star is a simple way to turn a few pieces of cotton fabric into something that can be brought out each Christmas.
Have a look through my other Christmas sewing and craft tutorials for more decorations, gift ideas and festive projects to make at home!
You can also find more video tutorials on my YouTube channel and follow @whatkimberleymakes on Instagram for new sewing, quilting and craft ideas.
Find your next project


If you’re looking for your next project, you can find more of my quilt patterns and sewing patterns in the shop. I’ve got everything from simple patchwork projects to larger quilts, with step-by-step instructions to help you turn all that quilt block practice into something finished. Browse the sewing patterns here →
Happy sewing! Kym


Comments